
The Raspberry Pi 4 came to market just a few weeks ago. For $35 to $55, plus some peripherals, you can run a desktop computer nearly as powerful. If you’re in the market and have the opportunity, I recommend you pick up the Raspberry Pi 4. For this project I am going to use a Raspberry Pi 3 B+. It’s not hearty enough for serving up steady HD video, but it should be fine for some of the projects that I have been working on at Flatiron.

So, wait, what is a Raspberry Pi? If you’re not yet aware, the Pi is a palm-sized computer originally built for young student learners. It is low cost and low power. It comes with no software preinstalled. A flavor of the Debian Linux operating system, called Raspbian, can be installed on an inexpensive microSD card and plugged into the available slot on the Pi board. Some versions come with USB and HDMI ports. Recent Pi models (Including 3 B+, 4, and Zero) come equipped with Wireless and Bluetooth. It is built with the novice in mind. The full distro of Raspbian comes with packaged with the software you might want to have in order to use the Pi like any other home computer.

What can you do with a Raspberry Pi? A lot. I’ve talked about using a Raspberry Pi to build (but not yet completely documented) my TNYGLXY project. A host for a TinyMux server. I hope to build a audio server and home automation interface, replacing commercial hardware by companies that don’t have a stellar relationship with privacy. And, of course, a development server for Rails and React applications.1
Let’s get going on our low-power server build.
Hardware
- Raspberry Pi 3 B+
- 5v Power Source with Micro USB connection
- A case (optional, but recommended)
- 16GB MicroSD card (at least)
- MicroSD card reader (if not built into your computer
- A Computer (Windows/Mac/Linux)
- A Wired Network Connection
Software
- Copy of a Raspbian Image (As of this writing, the Buster release; I’m using Buster Lite)
- Some way to write the Raspbian Image File. I’m using balenaEtcher, which is available for all Operating Systems.
- Some space on your local hard drive to keep the Raspbian Image
- A zip utility
- An SSH utility, like PuTTY
There is a version of Raspbian with a Window or Mac-like User Interface. For this project, by using the Lite image, I am omitting the UI and much of the standard packages (or software) that come with the larger installations. This gives me more control over what’s on my device, with the goal of navigating over potential conflicts. This system will also run ‘headless’ (that is, without a monitor, keyboard, or mouse). I can SSH directly into my Pi from any one of the computers that I keep around me at all times (including my phone).
Write the ISO to the SD Card
The first step is to get ISO written to the SD card. Place a formatted SD Card (FAT32 for cards smaller than 32GB; exFAT for anything larger, per the documentation. I’m using 16GB which is more than enough) in the card reader attached to your computer. When the drive is ready, you can start writing the ISO Image of Raspbian to the card.
balenaEtcher is dead simple to use. Simply click through the prompts until you get to the finished product. Follow along in the gallery below.

Add SSH file to boot Partition

Once balenaEtcher is done her magic, you will find that your SD card now has two partitions.

In the “boot” partition, add an empty file named ‘ssh’. This will let the Pi know to configure itself to accept an SSH connection from an external sources, ie: you.
Connect it Up
Carefully, remove the SD card from your computer, and insert it into the SD card slot on your Pi. Connect your network cable to the Ethernet port2 and then attach the power cable. Do this the other way around and you might not get assigned an IP address and nothing else will work.
There is a red LED on the front of the Pi. You can tell by the number and frequency of flashes how the boot is progressing. Once it’s solid red, you’re good to go. Any other pattern, there are problems. Consult the Raspberry Pi documentation as that’s not in scope for this tutorial.
Here is where things could get sticky. You need to find the IP Address for the Pi. The way that’s easiest for me in this headless scenario is to see what my Internet Router has assigned to the little computer.
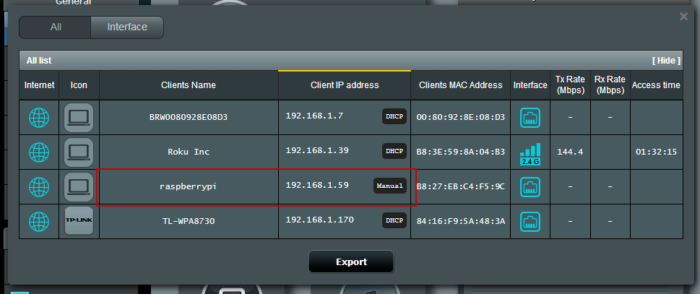
To do that, I logged in to my router and looked for connected devices. The one labelled “raspberrypi” is, obviously, the one I want.
If you don’t have access to your router (say, you were accessing your device on a public or work network), it would be best to connect a keyboard and monitor to the Pi and complete the steps *after* the bit with PuTTY.
Configure PuTTY

PuTTY is an Terminal SSH/Telnet utility that I’ve used for years. I’m sure you have, too, if you’ve had to remove connect to a network, especially before things like VPN utilities became so widely used. This is less user friendly than those, but certainly more powerful.
When you open PuTTY (or any other SSH utility) you will need to create a session. Enter the IP address of your Pi in the Host Name field.3 Select a connection type of ‘SSH.’ The port should set to ’22.’ If it does not, you can fix it.
I like to save my session so I can quickly access the Pi later. Give it a name and click ‘Save.’
For now, you can leave all other settings as they are.
Login
In PuTTY, click the button ‘Open.’ The configuration screen will close and a terminal window will open.
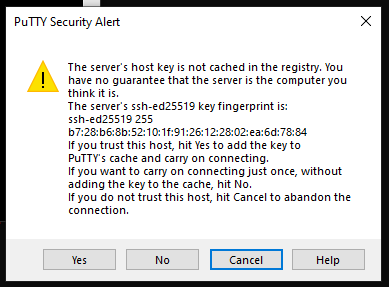
First, you may have to confirm the ssh key fingerprint. Clicking ‘Yes’ will add the key to PuTTY’s cache and save it for future connections. Click ‘Yes.’

The default login for the Raspbian is ‘pi’ with a password of ‘raspberry.’ When you log in, you should be see the prompt:
pi@raspberrypi:~ $At that prompt, type ‘passwd’ to change your, you know, password. You will have to confirm the existing password, choose a new one, and then confirm the new one.
Once that’s done and dusted, it’s time to update and upgrade your Pi.
Update and Upgrade
Why upgrade? When you downloaded your copy of the Raspbian Image, the date/time stamp on the release was likely in the past. Linux-based systems are updated constantly. So, between the time the release was published and now, there were likely updates made to packages by the great opensource community.
Type in the following:
sudo apt-get updateThis will download to your Pi a catalogue of all packages with changes. This will help the next process we run determine what packages need updating.
Type:
sudo apt-get upgradeThis will likely take a while, so go get a Diet Mt. Dew.4. What this command does is go through that list of updates, pulls down, and upgrades the packages currently on your pie. When it’s done you can be sure you have the latest and greatest available to you.
To run these two commands on a regular basis is good practice. Unless you have very specific requirements for your machine that requires a targeted or customized updates, this is the way forward.
What’s Next
Now that the Raspberry Pi is powered up and running Raspbian, you can start to load up on the other pieces of software you may need for a purpose built staging server. For the stack I work with, in the next blog post, I will install the following, along with any dependencies:
- Git
- Ruby
- Ruby on Rails
- React.js
- Bootstrap/React Bootstrap for UI
Until next time…
- Currently Raspberry Pi 3 B+ is $24 at your favorite computer super center, Microcenter. The Raspberry Pi Zero W is $5. Not as much power, and no wired Ethernet access, but a good place to start with a low barrier to entry. Amazon does *not* have the best prices. If you’re looking to buy in bulk, for whatever reason, try going right to the US Distributors. As for peripherals, including power and cases, bad is cheap; best is not that much more expensive. Better to buy the official branded or nearly anything they carry at Microcenter. Here, again, Amazon power supplies for the Pi have failed me. ↩
- New Raspberry Pis come with Wireless built in. Once your device is up and running you can turn on the wireless, if you choose. ↩
- In the future, you may want to point a domain name or subdomain at the dynamic IP address assigned by your service provider to your home internet connection, and then route that traffic to the local IP of your Pi. I will write a future blog on this topic. ↩
- Official Drink of Extreme Developers and Night Nurses. ↩
